You can use the Database explorer to register MySQL in the IDE. There are two simple steps that need to be performed:
1. Adding the Driver to the IDE
2. Creating a Database Connection
Adding the Driver to the IDE
In order to allow NetBeans IDE to communicate with a database, you need to employ a Java-based driver. Generally speaking, drivers in NetBeans IDE use the JDBC (Java Database Connectivity) API to communicate with databases supporting SQL. The JDBC API is contained in the java.sql Java package. A driver therefore serves as an interface that converts JDBC calls directly or indirectly into a specific database protocol.
In this tutorial, you are using the MySQL Connector/J driver, which is a pure Java implementation of the JDBC API, and communicates directly with the MySQL server using the MySQL protocol. To add the driver to the IDE:
1. If you have just downloaded the driver, first extract it to a location on your computer. Set the root directory to: C:\mysql-connector-java-5.0.5.
2. In the IDE, in the Database explorer from the Runtime window (Ctrl+5) expand the Databases node and right-click the Drivers node. Choose New Driver. The New JDBC Driver dialog opens.
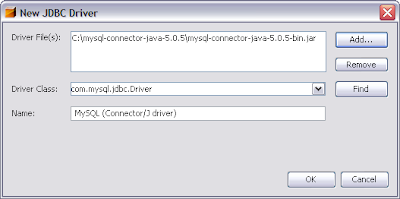
3. Click the Add button in the top right corner. Navigate to the driver's root directory and select the driver's jar file (e.g. mysql-connector-java-5.0.5-bin.jar). Click Open. The New JDBC Driver dialog should look like this:

New JDBC Driver dialog containing driver details
4. Click OK. In the Runtime window expand the Databases > Drivers nodes and note that a new MySQL driver node is displayed:
new driver node displayed in database explorer
Note: While you just made the database driver available to the IDE, you have not yet made it available to any specific application. At this stage, you can use the IDE to access and modify the database, but cannot do so from an application yet.
***********more at netbeans official site

1 comment:
I am trying to connect MySQL5.1 in Netbeans7.0.1 RC1 build in Windows 7.
But there connection refused error has been occured.
In Services --> Database --> RegisterMySQLServer i have given this details.
Basic Prop
HostName : localhost port : 3306 uname : root pwd : root
admin prop
Path/url admin tool : C:\Program Files\MySQL\MySQL Server 5.1\bin\mysql.exe
arg : <-- i have kept blank-->
Path to start cmd : C:\Program Files\MySQL\MySQL Server 5.1\bin\mysqld.exe
arg : <-- i have kept blank-->
path to stop cmd : C:\Program Files\MySQL\MySQL Server 5.1\bin\mysqladmin.exe
arg : -u root -proot stop
But connection refused error is coming. I checked jar file placed in correct place. And using mysql-connector-java-5.1.13-bin.jar.
Anybody knows solution, kindly help me
M.Muthu Ananth Haiahtum Software muthu.ananth@gmail.com
Post a Comment