Thursday, March 6, 2008

Setting up a JDBC Connection Pool

In order to specify how the web server allows an application to communicate with the database, we need to set up a database connection pool. A database connection pool is basically a group of reusable connections that a server maintains for a specific database. Web applications requesting a connection to a database obtain that connection from the pool. When an application closes a connection, the connection is returned to the pool.

In order to set up a connection pool on the server, a JDBC resource (also called a data source) must first be created. A JDBC resource provides applications with a connection to a database. Depending on whether you're using Tomcat or SJSAS, do the following:


see more here

How to RENAME a Java package...

if the 'package' statement at the top needs to change..


1.Projects > Source Packages > (Expand)
2.Right-click > Refactor > Rename
3.window
new name-new package name
comments
4.Next > Refactor

Wednesday, March 5, 2008

Creating a connection to a Database:

1. In the Services window choose 'Connect Using' from the right-click menu of the driver you just added. The New Database Connection dialog opens. see.....

2. In the Basic Setting tab, enter the Database's URL in the corresponding text field. The URL is used to identify the type and location of a database server. In this example, you need to specify the host name (i.e. the location of the server), the port number on which the database communicates, and the name of the database instance being used. In this case you can enter: jdbc:mysql://localhost:3306/MyNewDatabase
3. For User Name and Password, enter root, and nbuser respectively:

New Database Connection dialog containing connection details
4. Click OK, then click OK again to exit the dialog. A new Connection node displays in the Runtime window's Database explorer under the Databases node:

new connection node displayed in database explorer

You are now connected to MyNewDatabase in the IDE. Note that the new connection node icon appears whole when you are connected to a database. Likewise, it appears broken when there is no connection.

At later stages, when working with databases through the Database explorer, you may need to manually connect to a database. You can do so by right-clicking the broken database connection node and choosing Connect.

Registering the Database in NetBeans IDE

Now that you have the database server installed and configured, and have created a new database, you can register the MySQL server in NetBeans IDE. Begin by examining the functionality offered by the Database explorer located in the IDE's Runtime window (Ctrl+5). The Database explorer is represented by the Databases node (database node icon). From this interface you can connect to databases, view current connections, add database drivers, as well as create, browse or edit database structures.

You can use the Database explorer to register MySQL in the IDE. There are two simple steps that need to be performed:

1. Adding the Driver to the IDE
2. Creating a Database Connection

Adding the Driver to the IDE

In order to allow NetBeans IDE to communicate with a database, you need to employ a Java-based driver. Generally speaking, drivers in NetBeans IDE use the JDBC (Java Database Connectivity) API to communicate with databases supporting SQL. The JDBC API is contained in the java.sql Java package. A driver therefore serves as an interface that converts JDBC calls directly or indirectly into a specific database protocol.

In this tutorial, you are using the MySQL Connector/J driver, which is a pure Java implementation of the JDBC API, and communicates directly with the MySQL server using the MySQL protocol. To add the driver to the IDE:

1. If you have just downloaded the driver, first extract it to a location on your computer. Set the root directory to: C:\mysql-connector-java-5.0.5.
2. In the IDE, in the Database explorer from the Runtime window (Ctrl+5) expand the Databases node and right-click the Drivers node. Choose New Driver. The New JDBC Driver dialog opens.
3. Click the Add button in the top right corner. Navigate to the driver's root directory and select the driver's jar file (e.g. mysql-connector-java-5.0.5-bin.jar). Click Open. The New JDBC Driver dialog should look like this:

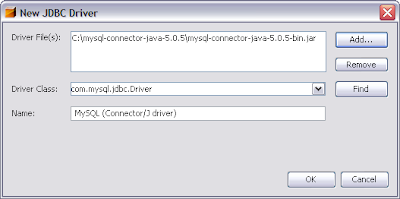
New JDBC Driver dialog containing driver details
4. Click OK. In the Runtime window expand the Databases > Drivers nodes and note that a new MySQL driver node is displayed:

new driver node displayed in database explorer

Note: While you just made the database driver available to the IDE, you have not yet made it available to any specific application. At this stage, you can use the IDE to access and modify the database, but cannot do so from an application yet.


***********more at netbeans official site

Switch From Uppercase to Lowercase

  • Ctrl-U, then U Convert selection to uppercase

  • Ctrl-U, then L Convert selection to lowercase

  • Ctrl-U, then S Toggle case of selection

Switch through files(Tabs) in the Editor

  1. Call up the list of all open tabs in the Editor by by pressing Ctrl-Tab while keeping the ctrl key pressed.
  2. Still with the ctrl key pressed, browse through the list of open tabs by hitting Ctrl-Tab; browse backwards through the list with Shift-Ctrl-Tab. Releasing the keys switches to the selected tab.
  3. Pressing Ctrl-Tab once and then letting both keys go immediately, will switch directly back to the previous tab used.
Note however, that in some operating systems, Ctrl-Tab is already associated with another conflicting action. In this case, use Ctrl-~ instead.

Tuesday, March 4, 2008

Compare Two Files in Netbeans6


  1. In the Projects tab, click and select with the ctrl key pressing two files.
  2. Right-click one of the selected files, and select Tools > Diff from the context menu.
  3. The graphical Diff view appears and lets you step through all differences.
Diffrent code blocks will be selected in different colors...

***
this is very important when you want to edit a file..
clone the orginal document(Rgt on doc tab>Clone Document) and edit.. then compare...

Note :

Diff only appears in the Tools menu when two files are selected and in focus.